JuiceDefender Ultimate (Increase Android Batterylife By 4X)
 This Is A Big issue in All
 android devices
that The battery life is too low...
Now We Are Getting Updated By New Cool Games Like
Spiderman Total Mayhem,Nova 3,Nfs Hot Pursuit,etc.
And We All Want To Play Games Not-Stop On Our Devices
BUT The Battery Always Messes Up Our experience..But No More
Thanks To Me XD..
So The App Is Called Juice Defender Ultimate Which Is Rated With 5 Stars on The PLAY Store
So This increase Ur Phone's Battery life By 4X..
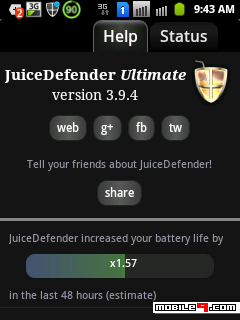
And I'm Not Copying This..The App Is Experienced By Me On GALAXY Ace And HTC INCREDIBLE So This Is A screenshot OF The App
So Just Download The Ultimate .Apk And Run It It Will Ask You Top Download The JUICEDEFENDER Free .APk For PLAYSTORE..Just Download That And Choose Your Preferred Settings
And Results Will Be In Front Of You
Juice defender .Apk From Here
Enjoy.....
How To Increase Internal Memory Of Htc Explorer
CONFIGURING YOUR SD CARD TO USE LINK2SD - NEVER WORRY ABOUT INTERNAL MEMORY
Guide to using Link2SD on your Explorer
This guide may seem lengthy, but trust us when I say it is straightforward. All steps have been documented which makes it look daunting. Read each section carefully and follow the steps outlined to install Link2SD.
1. PREPARATION
Please make sure you have completed all of the following before starting the tutorial.
On your PC:
Download and install MiniTool Partition Wizard onto your PC or laptop.
On your Explorer:
This app needs root privilege.To root your mobile follow this guide.
Install Link2SD from Android Market onto Explorer. It is a free download.
CREATING SECONDARY PARTITION ON YOUR SD CARD:
You now need to create a secondary partition on your microSD memory card that will enable you to use Link2SD.
Note: We will use MiniTool Partition Wizard to create a secondary partition on your microSD card. This partition can be ext2, ext3, ext4 or FAT32. We will use FAT32 as it is supported on all phones and should lead to less troubleshooting later (and the stock kernel of explorer only supports the fat32 partition,if you have any custom kernel with ext2,3,4 support i suggest using ext4 ). You can use any partition manager of your choosing, but the steps below guide you through MiniTool Partition Wizard.
There is no need to wipe your memory card when going through this process, just ensure you have at least 0.5GB to 1.0GB of free space to make it worthwhile. You also do not need to use a microSD card adapter as the process below creates the partition whilst the phone is connected to your PC.
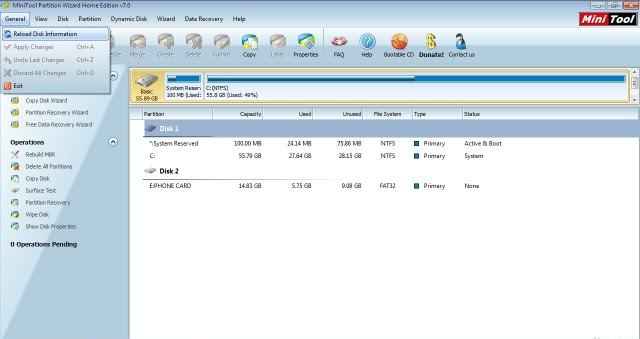
a) Connect your handset to the PC via USB and then launch MiniTool. You should see the details pop up under ‘Disk 2′.
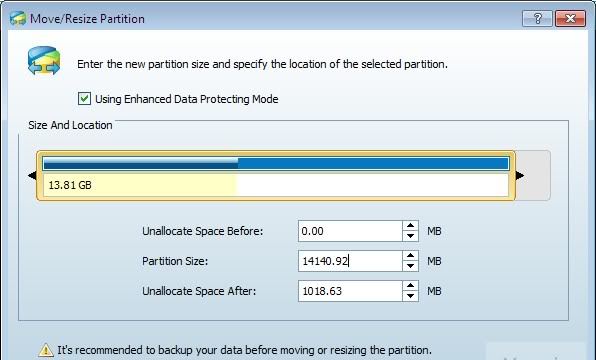
b) Click on the memory card under Disk 2 in Mini Tool and then in the left pane, press ‘Move/Re-size Partition’. On the blue bar under ‘Size and Location’, move the right arrow towards the left to create the size of the secondary partition desired. In the example below I created a secondary partition with 1018.63MB of space. This value can also be typed in manually in ‘Unallocate Space After’.
c) Once this is done you should see that your memory card is now split into two partitions under Disk 2 of Mini Tool. Right click this new partition and then press ‘Create’.
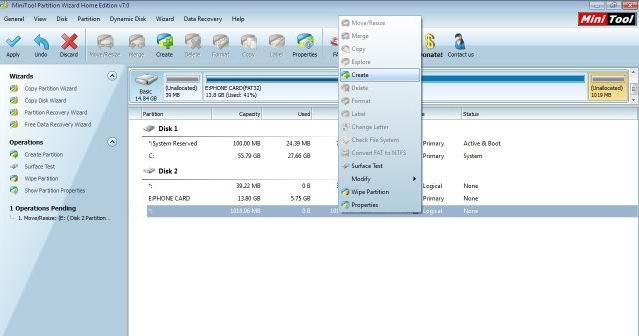
You'll see a pop-up ,just press ‘Yes’ to continue.
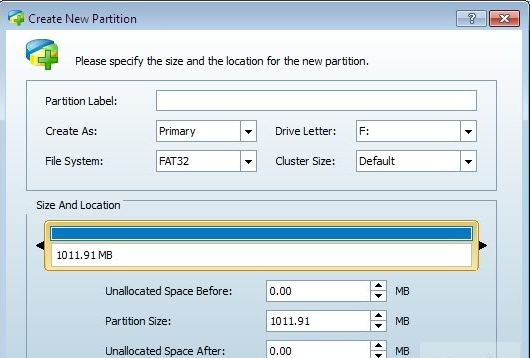
d) You should then see this ‘Create New Partition’ window. Under ‘Create As’ click Primary and then under ‘File System’ click FAT32. Leave the cluster size as default and you can assign whichever drive letter you want. Once finished press OK.
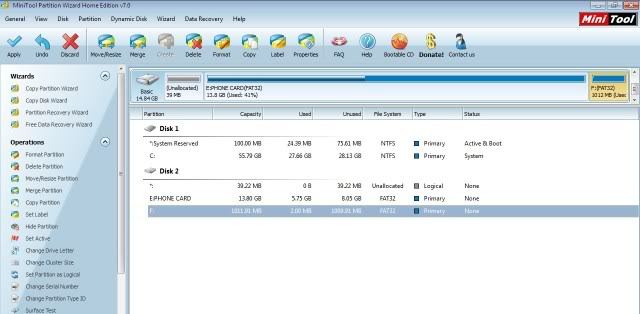
e) This should bring you back to the main Mini Tool screen. Now hit the ‘Apply’ button on the top-left of the screen, denoted by a tick symbol.
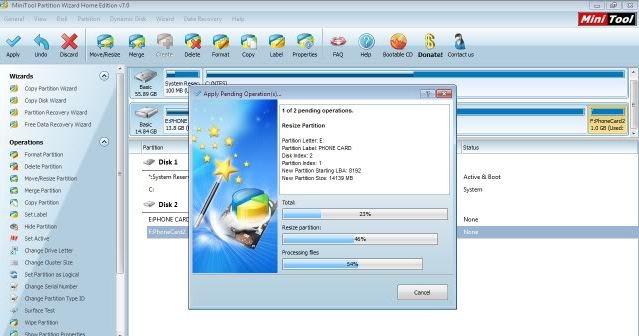
This will bring up another pop-up window and will take several minutes to both re-size and create the secondary partition.
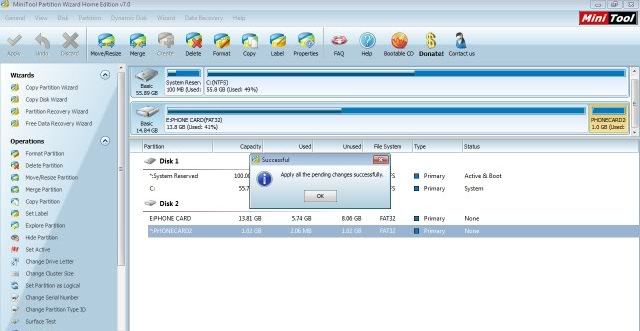
If successful, you should see message below. Congratulations your card is ready to use in conjunction with Link2SD. Restart your handset before moving to the next step.
2. LINK2SD
This application makes it easy for users with root privileges on their phone to move applications to the SD card.
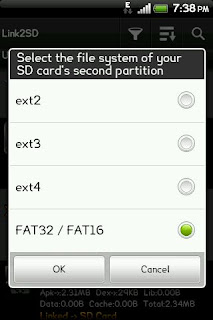
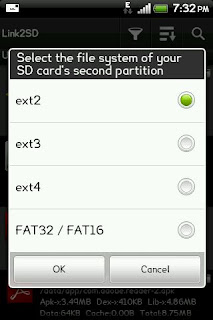
a) Open the Link2SD app on your phone. You should be greeted with the following menu, check the FAT32 option and click OK.
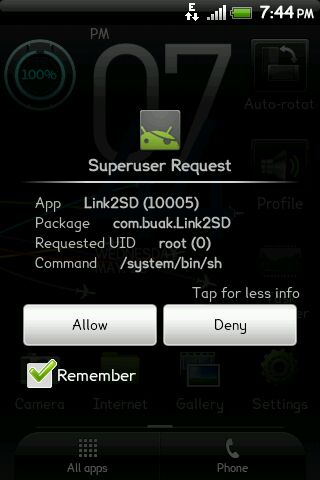
You will then see the Superuser Request, click ‘Allow’.
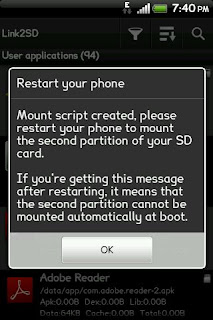
Once you see the following message, restart your phone. The app should now be ready to use.
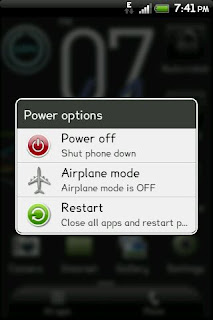
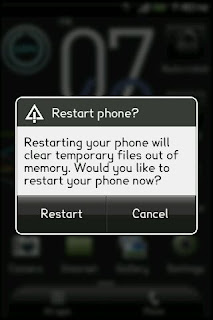
b) To make sure everything is installed correctly. Click the Menu button and go to ‘Storage Info’. This will show you the internal memory and your two partitions on the memory card. In my case, you can see that the second partition is 1GB(as i've used it for some apps its filled but u must see 1GB free i.e 100% free in your case).

c) Now you need to move the apps of your choice to the memory card. Click the Menu button and press ‘Multi-select’.
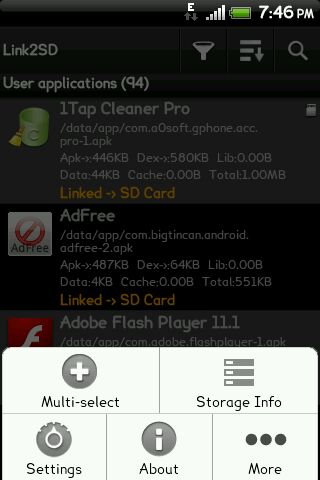
Choose which apps you want to move by clicking the tick box next to the app. System apps are greyed out and cannot be selected. Link2SD can only move apps that are already on the internal memory. If you have apps already on your SD card, you will need to move them back to the internal memory before you can link them with Link2SD.
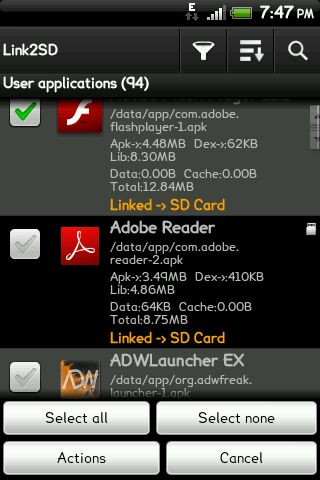
If you want to move all of your apps, pressing the multiselect will bring up another menu allowing you to do this by selecting select all.
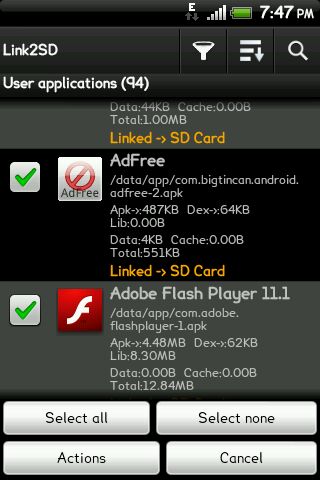
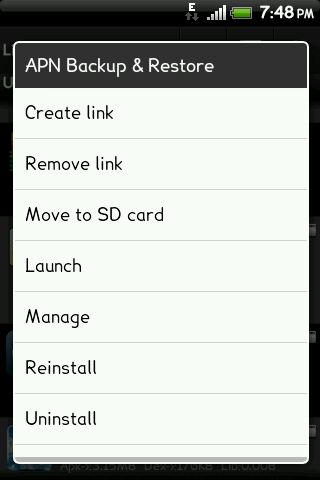
d) Once you have chosen which apps you want to move, you then need to hit the menu button and press ‘Actions’, which will bring up the following menu. Press ‘Create Link’.
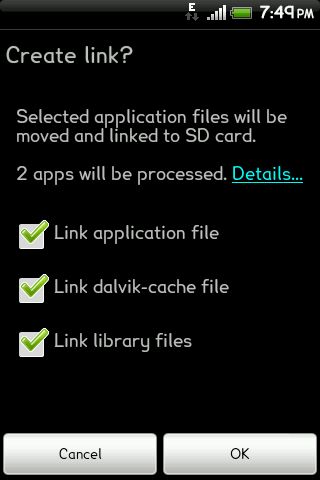
Leave all three check boxes ticked and press OK. Link2SD will now do its work and move/link the selected apps to your memory card.
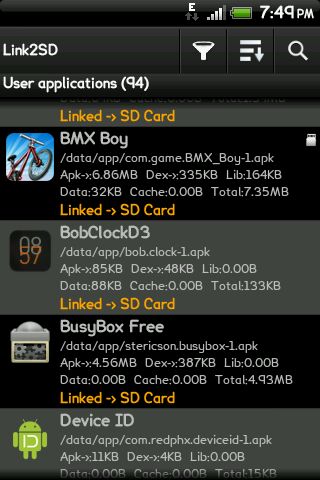
Once finished, you should see that the apps you have moved have ‘Linked -> SD Card’ in orange font in the Link2SD app list. Reboot your phone.
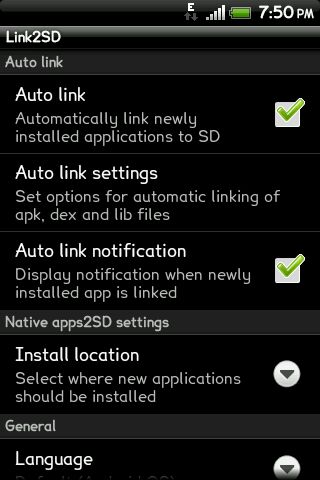
e) Congratulations your phone is now using Link2SD! You should now go to Settings by pressing the menu button and configure how you would like Link2SD to work. The main decision here is whether you want to Auto Link newly installed apps to the memory card. Given that you’ve gone through the hassle of installing Link2SD we suggest you enable Auto Link and make worrying about your internal memory a thing of the past.
After completing the above process to make sure your app data is correctly moved to sd ext download diskusage app to check your sd and data folders ,you should see something like this.
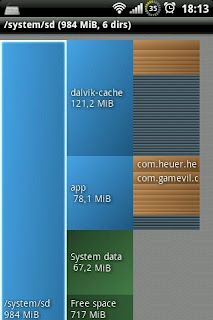
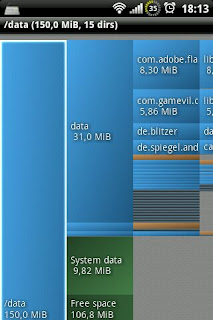
Now everything is configured and you are no more pestered with the "LOW MEMORY" warning.
Have a good day :)
CM9 Tweaks V2
-NOTE:I m not resposible if anythig happens to ur phone IN CASE
JuiceDefender Ultimate (Increase Android Batterylife By 4X)
 This Is A Big issue in All
that The battery life is too low...
Now We Are Getting Updated By New Cool Games Like
Spiderman Total Mayhem,Nova 3,Nfs Hot Pursuit,etc.
And We All Want To Play Games Not-Stop On Our Devices
BUT The Battery Always Messes Up Our experience..But No More
Thanks To Me XD..
So The App Is Called Juice Defender Ultimate Which Is Rated With 5 Stars on The PLAY Store
So This increase Ur Phone's Battery life By 4X..
And I'm Not Copying This..The App Is Experienced By Me On GALAXY Ace And HTC INCREDIBLE So This Is A screenshot OF The App
So Just Download The Ultimate .Apk And Run It It Will Ask You Top Download The JUICEDEFENDER Free .APk For PLAYSTORE..Just Download That And Choose Your Preferred Settings
And Results Will Be In Front Of You
Juice defender .Apk From Here
Enjoy.....
How To Increase Internal Memory Of Htc Explorer
CONFIGURING YOUR SD CARD TO USE LINK2SD - NEVER WORRY ABOUT INTERNAL MEMORY
Guide to using Link2SD on your Explorer
This guide may seem lengthy, but trust us when I say it is straightforward. All steps have been documented which makes it look daunting. Read each section carefully and follow the steps outlined to install Link2SD.
1. PREPARATION
Please make sure you have completed all of the following before starting the tutorial.
On your PC:
Download and install MiniTool Partition Wizard onto your PC or laptop.
On your Explorer:
This app needs root privilege.To root your mobile follow this guide.
Install Link2SD from Android Market onto Explorer. It is a free download.
CREATING SECONDARY PARTITION ON YOUR SD CARD:
You now need to create a secondary partition on your microSD memory card that will enable you to use Link2SD.
Note: We will use MiniTool Partition Wizard to create a secondary partition on your microSD card. This partition can be ext2, ext3, ext4 or FAT32. We will use FAT32 as it is supported on all phones and should lead to less troubleshooting later (and the stock kernel of explorer only supports the fat32 partition,if you have any custom kernel with ext2,3,4 support i suggest using ext4 ). You can use any partition manager of your choosing, but the steps below guide you through MiniTool Partition Wizard.
There is no need to wipe your memory card when going through this process, just ensure you have at least 0.5GB to 1.0GB of free space to make it worthwhile. You also do not need to use a microSD card adapter as the process below creates the partition whilst the phone is connected to your PC.
a) Connect your handset to the PC via USB and then launch MiniTool. You should see the details pop up under ‘Disk 2′.

b) Click on the memory card under Disk 2 in Mini Tool and then in the left pane, press ‘Move/Re-size Partition’. On the blue bar under ‘Size and Location’, move the right arrow towards the left to create the size of the secondary partition desired. In the example below I created a secondary partition with 1018.63MB of space. This value can also be typed in manually in ‘Unallocate Space After’.

c) Once this is done you should see that your memory card is now split into two partitions under Disk 2 of Mini Tool. Right click this new partition and then press ‘Create’.

You'll see a pop-up ,just press ‘Yes’ to continue.
d) You should then see this ‘Create New Partition’ window. Under ‘Create As’ click Primary and then under ‘File System’ click FAT32. Leave the cluster size as default and you can assign whichever drive letter you want. Once finished press OK.

e) This should bring you back to the main Mini Tool screen. Now hit the ‘Apply’ button on the top-left of the screen, denoted by a tick symbol.

This will bring up another pop-up window and will take several minutes to both re-size and create the secondary partition.

If successful, you should see message below. Congratulations your card is ready to use in conjunction with Link2SD. Restart your handset before moving to the next step.

2. LINK2SD
This application makes it easy for users with root privileges on their phone to move applications to the SD card.
a) Open the Link2SD app on your phone. You should be greeted with the following menu, check the FAT32 option and click OK.


You will then see the Superuser Request, click ‘Allow’.

Once you see the following message, restart your phone. The app should now be ready to use.


b) To make sure everything is installed correctly. Click the Menu button and go to ‘Storage Info’. This will show you the internal memory and your two partitions on the memory card. In my case, you can see that the second partition is 1GB(as i've used it for some apps its filled but u must see 1GB free i.e 100% free in your case).

c) Now you need to move the apps of your choice to the memory card. Click the Menu button and press ‘Multi-select’.

Choose which apps you want to move by clicking the tick box next to the app. System apps are greyed out and cannot be selected. Link2SD can only move apps that are already on the internal memory. If you have apps already on your SD card, you will need to move them back to the internal memory before you can link them with Link2SD.

If you want to move all of your apps, pressing the multiselect will bring up another menu allowing you to do this by selecting select all.

d) Once you have chosen which apps you want to move, you then need to hit the menu button and press ‘Actions’, which will bring up the following menu. Press ‘Create Link’.

Leave all three check boxes ticked and press OK. Link2SD will now do its work and move/link the selected apps to your memory card.

Once finished, you should see that the apps you have moved have ‘Linked -> SD Card’ in orange font in the Link2SD app list. Reboot your phone.

e) Congratulations your phone is now using Link2SD! You should now go to Settings by pressing the menu button and configure how you would like Link2SD to work. The main decision here is whether you want to Auto Link newly installed apps to the memory card. Given that you’ve gone through the hassle of installing Link2SD we suggest you enable Auto Link and make worrying about your internal memory a thing of the past.

After completing the above process to make sure your app data is correctly moved to sd ext download diskusage app to check your sd and data folders ,you should see something like this.


Now everything is configured and you are no more pestered with the "LOW MEMORY" warning.
Have a good day :)
CM9 Tweaks V2
-NOTE:I m not resposible if anythig happens to ur phone IN CASE
1. PREPARATION
Please make sure you have completed all of the following before starting the tutorial.
On your PC:
Download and install MiniTool Partition Wizard onto your PC or laptop.
On your Explorer:
This app needs root privilege.To root your mobile follow this guide.
Install Link2SD from Android Market onto Explorer. It is a free download.
CREATING SECONDARY PARTITION ON YOUR SD CARD:
You now need to create a secondary partition on your microSD memory card that will enable you to use Link2SD.
Note: We will use MiniTool Partition Wizard to create a secondary partition on your microSD card. This partition can be ext2, ext3, ext4 or FAT32. We will use FAT32 as it is supported on all phones and should lead to less troubleshooting later (and the stock kernel of explorer only supports the fat32 partition,if you have any custom kernel with ext2,3,4 support i suggest using ext4 ). You can use any partition manager of your choosing, but the steps below guide you through MiniTool Partition Wizard.
There is no need to wipe your memory card when going through this process, just ensure you have at least 0.5GB to 1.0GB of free space to make it worthwhile. You also do not need to use a microSD card adapter as the process below creates the partition whilst the phone is connected to your PC.
a) Connect your handset to the PC via USB and then launch MiniTool. You should see the details pop up under ‘Disk 2′.

b) Click on the memory card under Disk 2 in Mini Tool and then in the left pane, press ‘Move/Re-size Partition’. On the blue bar under ‘Size and Location’, move the right arrow towards the left to create the size of the secondary partition desired. In the example below I created a secondary partition with 1018.63MB of space. This value can also be typed in manually in ‘Unallocate Space After’.

c) Once this is done you should see that your memory card is now split into two partitions under Disk 2 of Mini Tool. Right click this new partition and then press ‘Create’.

You'll see a pop-up ,just press ‘Yes’ to continue.
d) You should then see this ‘Create New Partition’ window. Under ‘Create As’ click Primary and then under ‘File System’ click FAT32. Leave the cluster size as default and you can assign whichever drive letter you want. Once finished press OK.

e) This should bring you back to the main Mini Tool screen. Now hit the ‘Apply’ button on the top-left of the screen, denoted by a tick symbol.

This will bring up another pop-up window and will take several minutes to both re-size and create the secondary partition.

If successful, you should see message below. Congratulations your card is ready to use in conjunction with Link2SD. Restart your handset before moving to the next step.

2. LINK2SD
This application makes it easy for users with root privileges on their phone to move applications to the SD card.
a) Open the Link2SD app on your phone. You should be greeted with the following menu, check the FAT32 option and click OK.


You will then see the Superuser Request, click ‘Allow’.

Once you see the following message, restart your phone. The app should now be ready to use.


b) To make sure everything is installed correctly. Click the Menu button and go to ‘Storage Info’. This will show you the internal memory and your two partitions on the memory card. In my case, you can see that the second partition is 1GB(as i've used it for some apps its filled but u must see 1GB free i.e 100% free in your case).

c) Now you need to move the apps of your choice to the memory card. Click the Menu button and press ‘Multi-select’.

Choose which apps you want to move by clicking the tick box next to the app. System apps are greyed out and cannot be selected. Link2SD can only move apps that are already on the internal memory. If you have apps already on your SD card, you will need to move them back to the internal memory before you can link them with Link2SD.

If you want to move all of your apps, pressing the multiselect will bring up another menu allowing you to do this by selecting select all.

d) Once you have chosen which apps you want to move, you then need to hit the menu button and press ‘Actions’, which will bring up the following menu. Press ‘Create Link’.

Leave all three check boxes ticked and press OK. Link2SD will now do its work and move/link the selected apps to your memory card.

Once finished, you should see that the apps you have moved have ‘Linked -> SD Card’ in orange font in the Link2SD app list. Reboot your phone.

e) Congratulations your phone is now using Link2SD! You should now go to Settings by pressing the menu button and configure how you would like Link2SD to work. The main decision here is whether you want to Auto Link newly installed apps to the memory card. Given that you’ve gone through the hassle of installing Link2SD we suggest you enable Auto Link and make worrying about your internal memory a thing of the past.

After completing the above process to make sure your app data is correctly moved to sd ext download diskusage app to check your sd and data folders ,you should see something like this.


Now everything is configured and you are no more pestered with the "LOW MEMORY" warning.
Have a good day :)
CM9 Tweaks V2
-NOTE:I m not resposible if anythig happens to ur phone IN CASE
Features:
Build.prop V2 new-Geeky Engine
-Adrenaline Engine CM
-Battery Backup Improvement( You Will Feel The Difference )
-Touch Response Improved
-Scrolling Made Smoother
-Signal Tweaks , Wi-Fi Speed Improved
-Fast Booting
-LoopySmoothness Tweak
-CM9 Tweaks.apk {i dont remember his name sorry!!}

-GPU And CPU Performance Improved new
-Smoother Video Streaming new
-Better Scrolling Responsiveness and speed new
-Better Internet Browsing And Downloading Speed new
-Deep Sleep Enabled to Save Battery new
-More Free Ram new
-Increase Camera's Photo and Video Recording Quality new
-Allowed Dalvik to use JIT(Just in Time) new
-Increased General Performance new
-Increased ext4 Performance new
Download the zip file from here
INSTRUCTIONS
Please Make Sure You have NO-Frills CPU Control installed ( Included in the zip )
->Put The Governor on Interactive
->Enable deep sleep from its settings( Optional )
->I/O Scheduler---- cfq
-CM9 Tweaks.apk
->Rebuild Database Twice
-> Current Tweaks-- Stock
-Adrenaline Engine
-> Mount System And Data From Mounts and Storage
->Flash The ZIP (Adrenaline_Engine_CM_4.3)
-Geeky Engine by foreverking
->Flash the ZIP(Geeky Engine)
->Normally Flash
-LoopySmoothness
-> Paste "07loopy_smoothness_tweak" in /system/etc/init.d
->Tick all The Permissions see the images below
-Build.prop ( v2 By me) new
-> Use Root Explorer / Es File Explorer
-> Rename "buildv2.prop" to "build.prop"
->Browse to /system
->Paste There
->Overwrite the previous one
->Reboot
-CPU Tweaks
-> Flash The ZIP (CPU Tweaks)
->Reboot
-Awesome Beatsv3
-> Flash The ZIP (AwesomeBEATSv3)
->Go to Sound
-> Click on Music Effects
-> Choose AwesomeBeats
-> Done!
-Adrenaline Engine Uninstaller( If You Face Any Long time reboot and booting duration ) new
-> Go to Recovery
-> Then Mounts & Storage
-> Mount System and Data
-> Install "Adrenaline_Engine_Uninstaller.zip" ( Included in The ZIP )
->Enable deep sleep from its settings( Optional )
->I/O Scheduler---- cfq
-CM9 Tweaks.apk
->Rebuild Database Twice
-> Current Tweaks-- Stock
-Adrenaline Engine
-> Mount System And Data From Mounts and Storage
->Flash The ZIP (Adrenaline_Engine_CM_4.3)
-Geeky Engine by foreverking
->Flash the ZIP(Geeky Engine)
->Normally Flash

-LoopySmoothness
-> Paste "07loopy_smoothness_tweak" in /system/etc/init.d
->Tick all The Permissions
 see the images below
-Build.prop ( v2 By me) new

-> Use Root Explorer / Es File Explorer
-> Rename "buildv2.prop" to "build.prop"
->Browse to /system
->Paste There
->Overwrite the previous one
->Reboot
-CPU Tweaks
-> Flash The ZIP (CPU Tweaks)
->Reboot
-Awesome Beatsv3
-> Flash The ZIP (AwesomeBEATSv3)
->Go to Sound
-> Click on Music Effects
-> Choose AwesomeBeats
-> Done!

-Adrenaline Engine Uninstaller( If You Face Any Long time reboot and booting duration ) new
-> Go to Recovery
-> Then Mounts & Storage
-> Mount System and Data
-> Install "Adrenaline_Engine_Uninstaller.zip" ( Included in The ZIP )
No comments:
Post a Comment